Mattermost 記事まとめ: https://blog.kaakaa.dev/tags/mattermost/
本記事について
Mattermost の統合機能アドベントカレンダーの第 21 日目の記事です。
昨日に引き続き、Mattermost 上の様々な操作に対応した処理を追加できる Mattermost Plugin のWebappサイドの機能を紹介していきます。。
Mattermost Plugin についての公式ドキュメントは下記になります。 https://developers.mattermost.com/extend/plugins/overview/
サンプルコードは下記リポジトリにコミットしています。 https://github.com/kaakaa/mattermost-plugin-api-sample
Webapp Plugin API
registerWebSocketEventHandler
registerWebSocketEventHandlerは、Mattermost Server から送信される WebSocket イベントを処理する Handler を登録します。
registerWebSocketEventHandlerは 2 つの引数を取ります。
event: 処理する WebSocket イベントの種別handler: WebSocket イベントのデータを引数に取る関数。引数のデータはイベントによって異なります。
Server プラグインのPublishWebSocketEventと組み合わせて使用すると強力ですが、その辺りの例については 22 日目以降の記事で紹介します。
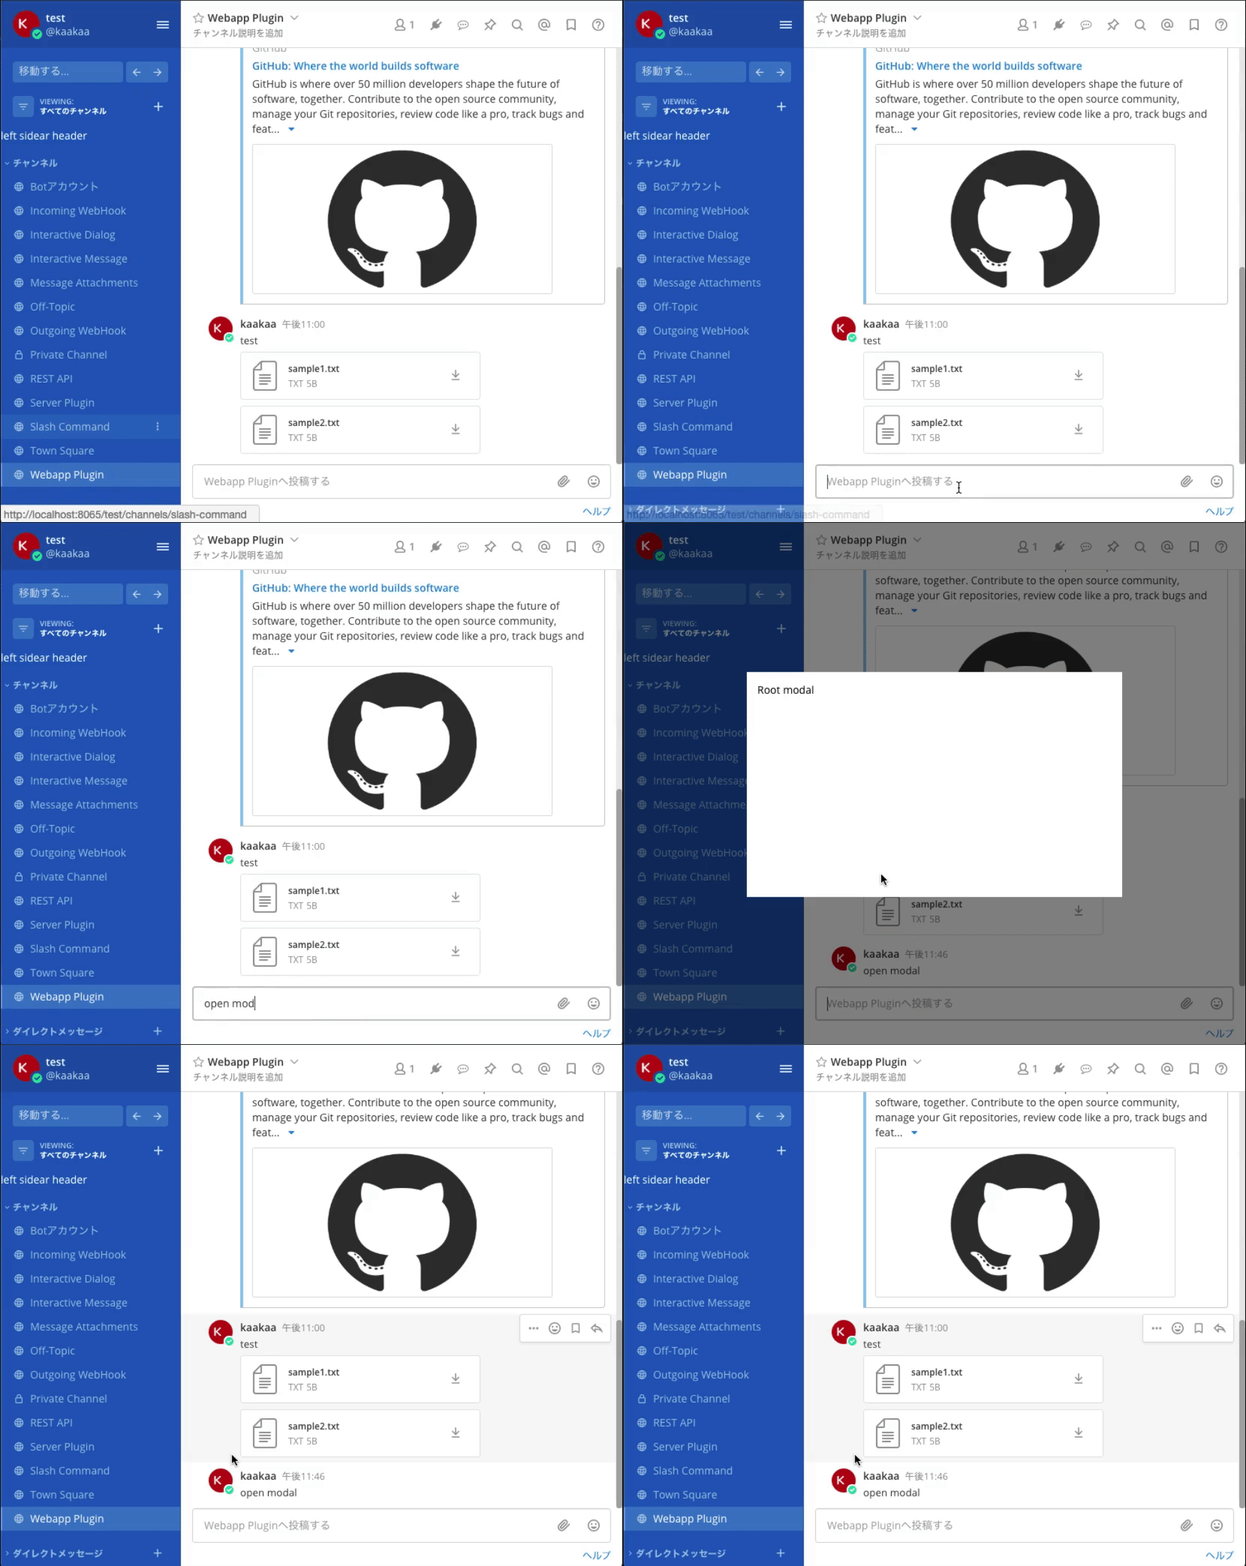
ここでは、Mattermost デフォルトの WebSocket イベントである投稿が作成された際に送信されるpostedイベントを受信した際に、投稿内容にopen modalという文言が入っていた場合にモーダルを開く例を以下に示します。
...
import {openRootModal, createPluginPost} from './actions';
...
export default class Plugin {
    // eslint-disable-next-line no-unused-vars
    initialize(registry, store) {
		...
        // 'open modal'を含む投稿を受信するとモーダルを開く
        registry.registerWebSocketEventHandler(
            'posted',
            (event) => {
                const post = JSON.parse(event.data.post);
                if (post && post.message && post.message.includes('open modal')) {
                    store.dispatch(openRootModal());
                }
            }
        );
    }
}
unregisterWebSocketEventHandler
unregisterWebSocketEventHandlerは、registerWebSocketEventHandlerによって WebSocket イベントに対して設定された Handler を登録から除外します。
例は省略します。
registerReconnectHandler
registerReconnectHandlerは、一度インターネット接続が失われた後に再び Mattermost へ接続した際に実行される Handler です。
registerReconnectHandlerは引数のない関数を引数に取ります。
handler: Mattermost へ再接続した際に実行される関数
例は省略します。
unregisterReconnectHandler
unregisterReconnectHandlerは、registerReconnectHandlerで登録した Handler を登録から除外します。引数は取りません。
こちらも例は省略します。
registerMessageWillBePostedHook
registerMessageWillBePostedHookは、ユーザーが投稿を送信した際、その投稿がサーバーに送信される前に実行される処理を登録します。
registerMessageWillBePostedHookは、引数を 1 つ取ります。
hook: ユーザーによって投稿処理が実行された際、その投稿がサーバーに送信される直前に実行される処理
hooksは、引数を一つ取ります。
post: 投稿の情報
hookの返り値として、投稿情報を持つerrorフィールドを含む値を返却した場合、投稿は reject されます。投稿情報を持つpostフィールドのを含むオブジェクトを返却した場合は、postフィールドの値で投稿が作成されます。
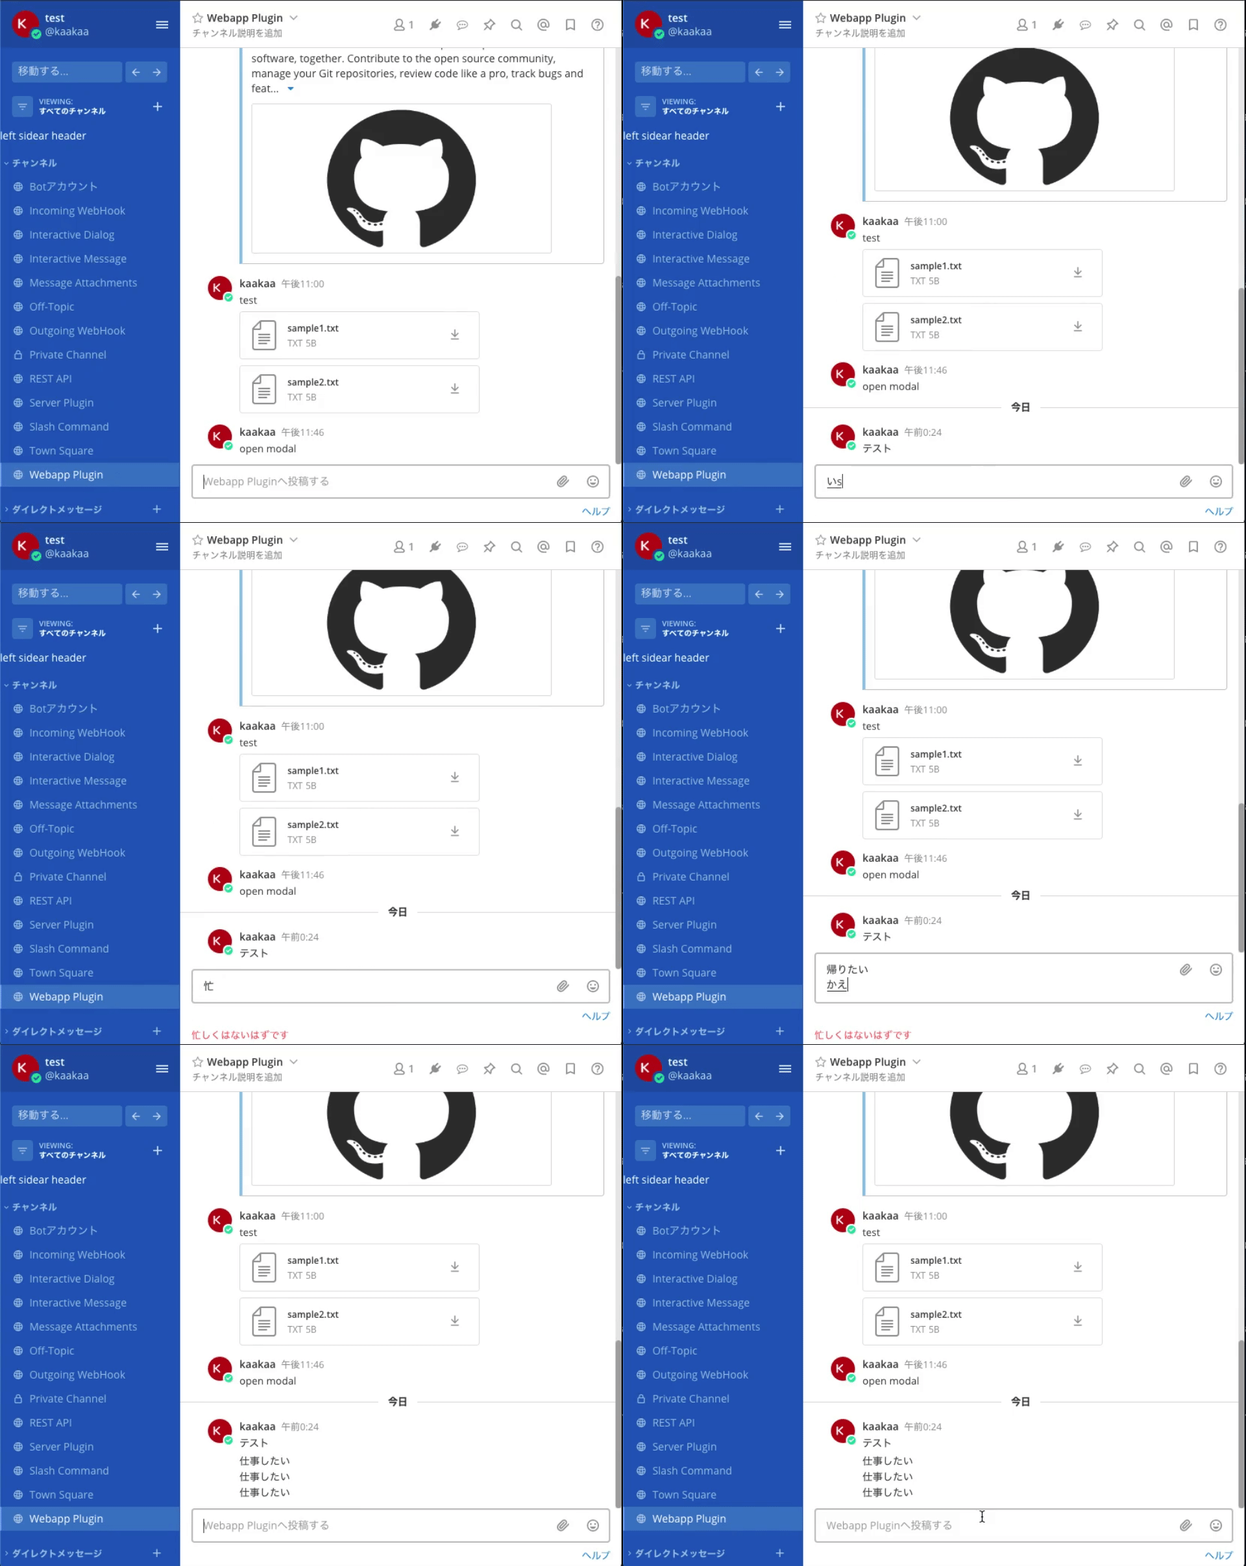
忙しいという文言を含む投稿を作成すると reject され、帰りたいという文言を含む投稿を作成すると仕事したいに変換される例を以下に示します。
...
export default class Plugin {
    // eslint-disable-next-line no-unused-vars
    initialize(registry, store) {
		...
        // 投稿がサーバーに送信される前にrejectしたり内容を変換したりする
        registry.registerMessageWillBePostedHook(
            (post) => {
                if (post.message && post.message.includes('忙しい')) {
                    return {error: {message: '忙しくはないはずです'}};
                }
                post.message = post.message.replace(/帰りたい/gi, '仕事したい');
                return {post: post};
            }
        );
    }
}
registerSlashCommandWillBePostedHook
registerSlashCommandWillBePostedHookは、ユーザーが Slash Command を実行した際、その投稿がサーバーに送信される前に実行される処理を登録します。
registerSlashCommandWillBePostedHookは、引数を 1 つ取ります。
hook: Slash Command が実行された際に、その内容がサーバーに送信される直前に実行される処理
hookは、引数を 2 つ取ります。
message: 投稿されたメッセージargs: Slash Command 実行情報(channel_id,team_id,root_id,parent_id)
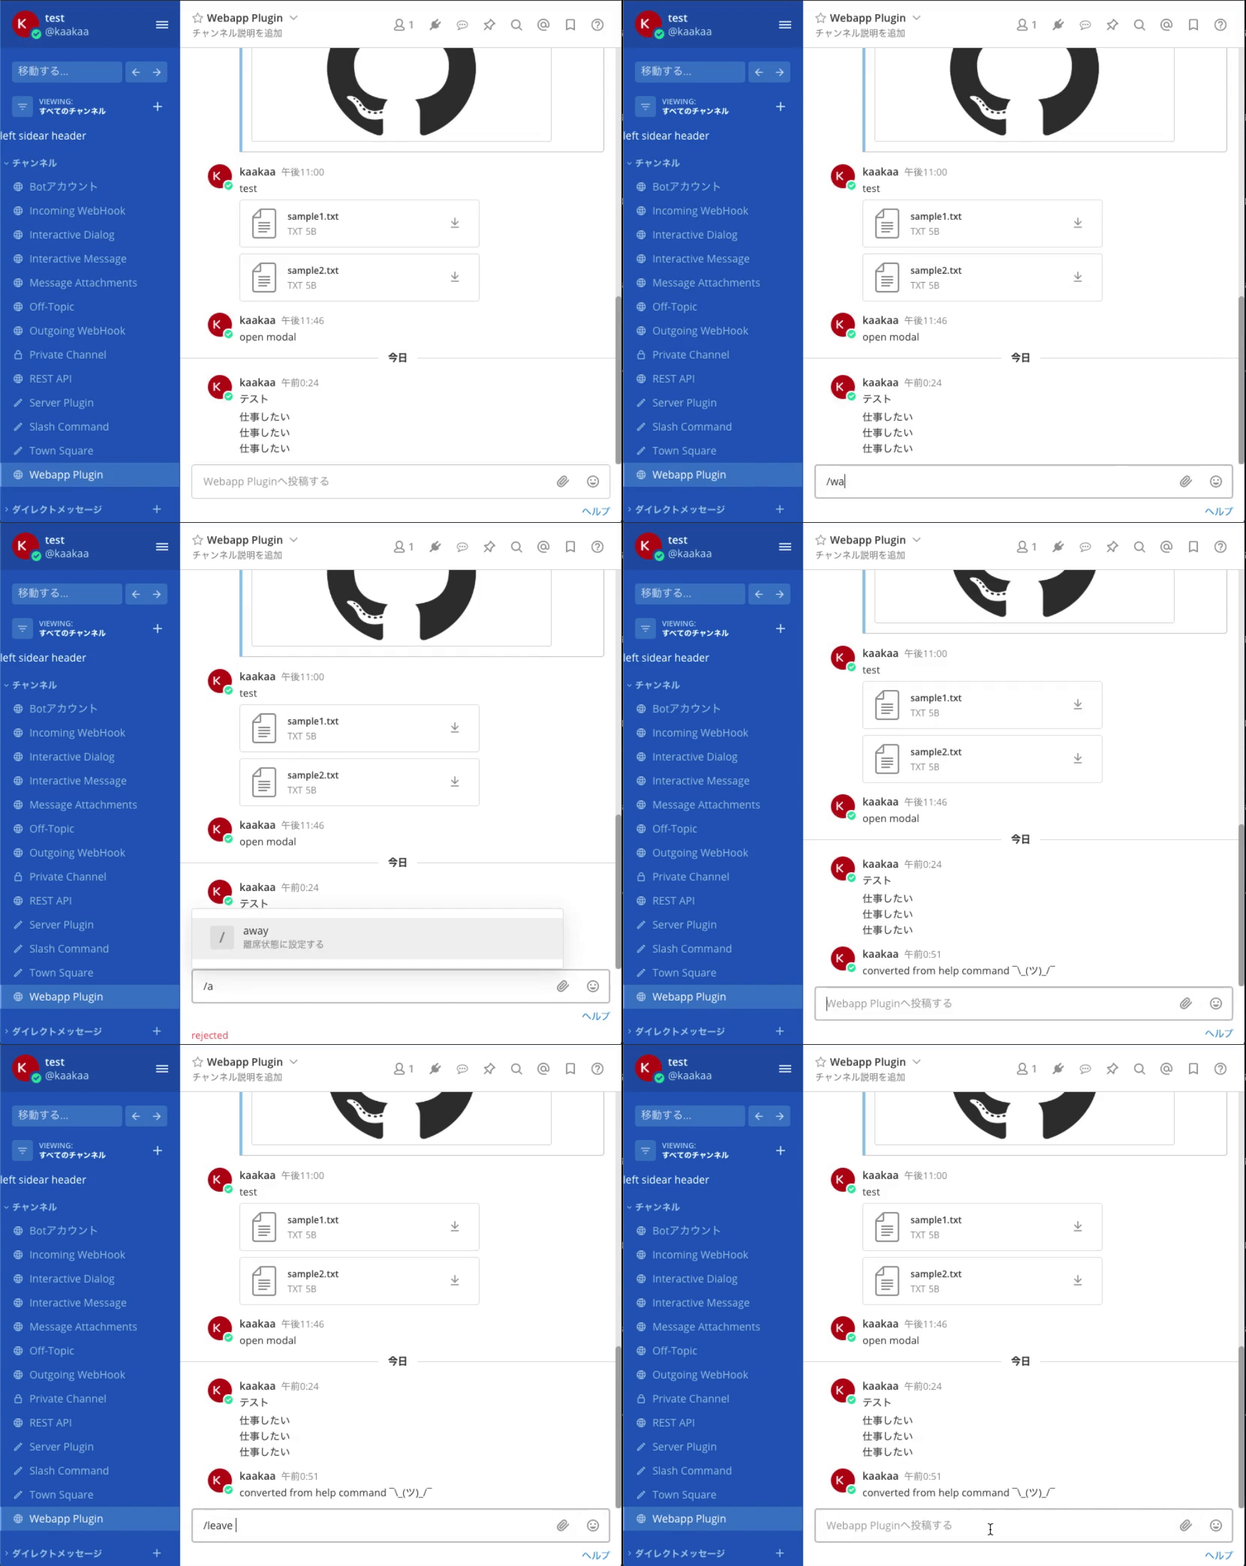
/awayを reject、/helpを/shrugに書き換え、/leaveをエラーメッセージなしで reject するような処理を実行する例を以下に示します。
...
export default class Plugin {
    // eslint-disable-next-line no-unused-vars
    initialize(registry, store) {
		...
        // Slash Commandがサーバーに送信される前に実行される処理を追加する
        registry.registerSlashCommandWillBePostedHook(
            (message, args) => {
                console.log(message);
                if (message.startsWith('/away')) {
                    return {error: {message: 'rejected'}};
                }
                if (message.startsWith('/help')) {
                    console.log('help');
                    return {message: '/shrug converted from help command', args};
                }
                if (message.startsWith('/leave')) {
                    console.log('leave');
                    return {};
                }
            }
        );
    }
}
registerMessageWillFormatHook
registerMessageWillFormatHookは、投稿したメッセージが Markdown テキストとして変換される直前に実行される処理を登録します。
registerMessageWillFormatHookは、引数を 1 つ取ります。
hook: 投稿が Markdown テキストとして変換される直前に実行される処理
hookは、引数を 2 つ取ります。
post: 変換されていない投稿情報message: 投稿されたメッセージ(プラグインによって変換されている可能性あり)
hookの返却値として返された文字列が投稿として表示されます。
registerMessageWillBePostedHookは、投稿がサーバーに送信される前に投稿内容を編集するものでしたが、このregisterMessageWillFormatHookは、投稿がサーバーに送信・保存された後にレンダリングされる際にメッセージを編集するものだと思われます。
良い利用方法が思いつかないので例は省略します。
registerFilePreviewComponent
registerFilePreviewComponentは、ファイルプレビュー用の独自の Component を登録します。
registerFilePreviewComponentは、2 つの関数を引数に取ります。
override: 独自のファイルプレビュー Component を使用するかどうかを決定するための関数。以下の 2 つを引数に取ります。component: ファイルプレビュー用の Component
overrideは、引数を 2 つ取ります。
fileInfo: ファイルの情報post: 投稿の情報
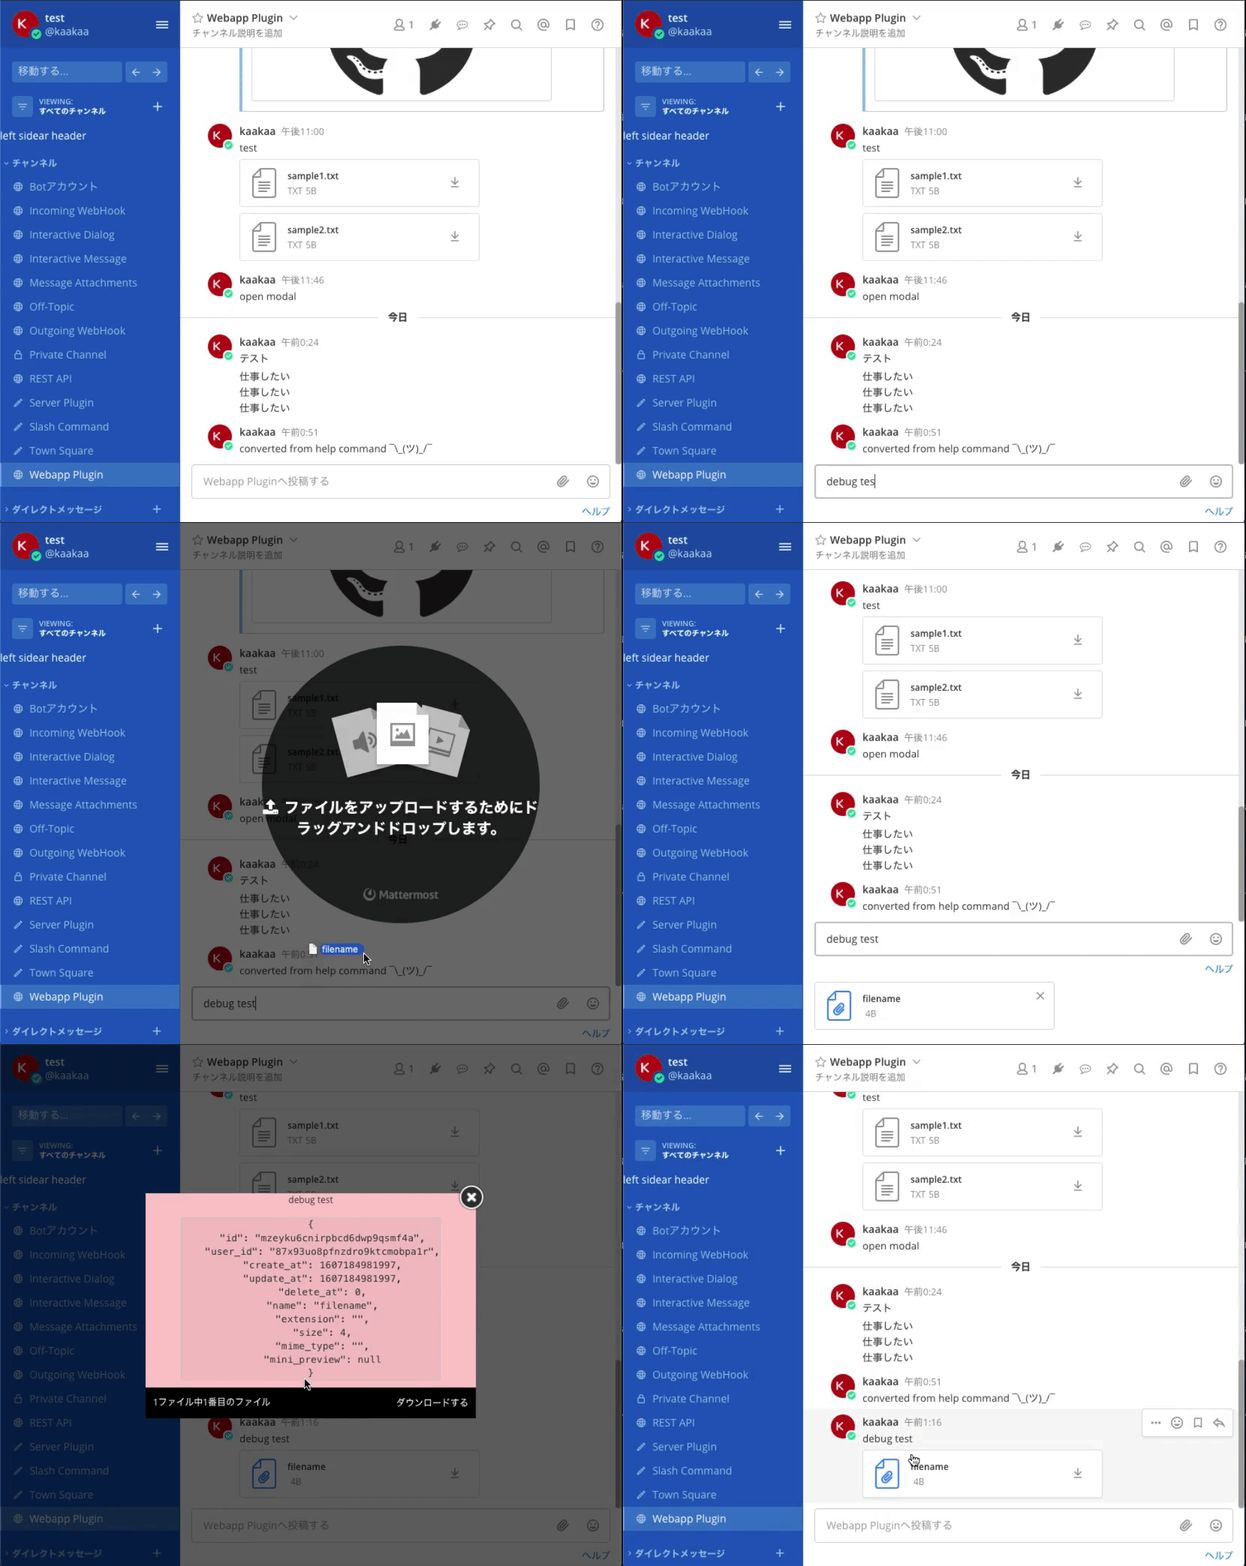
debugで始まるメッセージを持つ投稿の添付ファイルをプレビューする際に、独自のコンポーネントを使用する例を以下に示します。
...
import CustomFilePreview from './components/custom_file_preview';
...
export default class Plugin {
    // eslint-disable-next-line no-unused-vars
    initialize(registry, store) {
		...
        // `debug`で始まるメッセージを持つ投稿の添付ファイルを独自コンポーネントでプレビューする
        registry.registerFilePreviewComponent(
            (fileInfo, post) => { return post.message && post.message.startsWith('debug'); },
            CustomFilePreview
        );
    }
}
import React from 'react';
import PropTypes from 'prop-types';

const {formatText, messageHtmlToComponent} = window.PostUtils;

const CustomFilePreviewComponent = ({fileInfo, post}) => {
    const formattedText = messageHtmlToComponent(formatText(post.message));

    return (
        <div style={{backgroundColor: '#ffcccc'}}>
            {formattedText}
            <pre>
                {JSON.stringify(fileInfo, null, 4)}
            </pre>
        </div>
    )
}

CustomFilePreviewComponent.propTypes = {
    fileInfo: PropTypes.object.isRequired,
    post: PropTypes.object.isRequired,
};

export default CustomFilePreviewComponent;
registerTranslations
registerTranslationsは、プラグイン内で使用しているメッセージの翻訳データを登録します。
registerTranslationsは、localeを引数にとり、そのlocaleに対する翻訳データを返す関数を引数に取ります。
RootModal 内のメッセージを日本語に翻訳する例を作ってみましたが、どうやら翻訳が正常に動作していない模様?
...
import ja from 'i18n/';
...
export default class Plugin {
    // eslint-disable-next-line no-unused-vars
    initialize(registry, store) {
		...
        // 翻訳メッセージを登録する
        registry.registerTranslations((locale) => {
            switch (locale) {
            case 'en':
                return en;
            case 'ja':
                return ja;
            }
            return {};
        });
    }
}
{
    "rootModal.message": "ルートモーダル"
}
import React from 'react';

import {FormattedMessage} from 'react-intl';

const Root = ({visible, close}) => {
    if (!visible) {
        return null;
    }

    const style = getStyle();

    return (
        <div
            style={style.backdrop}
            onClick={close}
        >
            <div style={style.modal}>
                <FormattedMessage
                    id='rootModal.message'
                    defaultMessage='Root Modal2'
                />
            </div>
        </div>
    );
};

Root.propTypes = {
    visible: PropTypes.bool.isRequired,
    close: PropTypes.func.isRequired,
};

const getStyle = () => ({
    backdrop: {
        position: 'absolute',
        display: 'flex',
        top: 0,
        left: 0,
        right: 0,
        bottom: 0,
        backgroundColor: 'rgba(0, 0, 0, 0.50)',
        zIndex: 2000,
        alignItems: 'center',
        justifyContent: 'center',
    },
    modal: {
        height: '300px',
        width: '500px',
        padding: '1em',
        color: 'black',
        backgroundColor: 'white',
    },
});

export default Root;
registerAdminConsolePlugin
registerAdminConsolePluginは、AdminConsole(システムコンソール?)の内容を上書きするための関数を登録します。
Mattermost 内部での利用が主目的であり、ユーザープラグインによる使用は推奨されていないようなので例は省略します。(使い方がよく分からない)
unregisterAdminConsolePlugin
unregisterAdminConsolePluginは、registerAdminConsolePluginで登録した AdminConsole 上書き用関数を登録から除外します。
registerAdminConsolePluginが Mattermost 内部での利用が主目的のため、こちらも説明、例は省略します。
registerAdminConsoleCustomSetting
registerAdminConsoleCustomSettingは、プラグイン用の設定画面に独自のコンポーネントを追加します。
このプラグイン API については、公式ドキュメントのBest Practicesのページに詳細にまとめられています。
Mattermost Plugin では、マニフェストファイルのsettings_schemaという項目を指定することで、プラグイン専用の設定項目を作成することができます。
https://developers.mattermost.com/extend/plugins/manifest-reference/
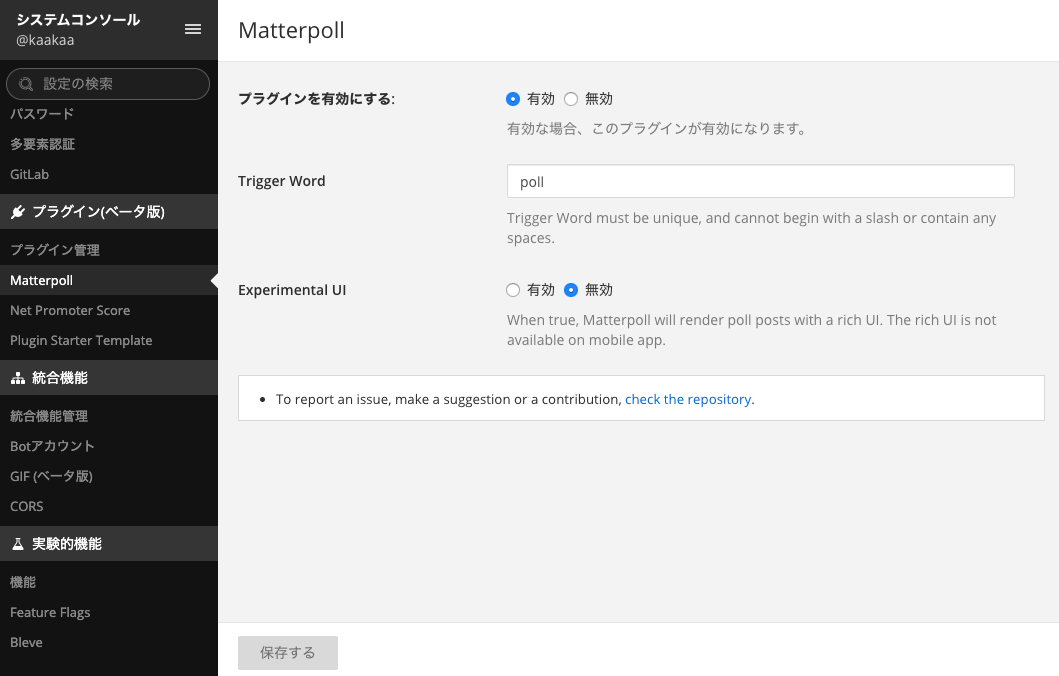
デフォルトでは、下記のtypeを持つ設定項目を追加することができます。
- “bool”: ラジオボタン (2 値)
- “dropdown”: ドロップダウンメニュー
- “generated”: 自動生成テキスト
- “radio”: ラジオボタン (任意)
- “text”: インプットボックス
- “longtext”: 複数行テキスト
- “number”: 数値入力欄
- “username”:ユーザー名入力欄
デフォルトのtype以外の設定項目を指定したい場合にregisterAdminConsoleCustomSettingを使用します。
registerAdminConsoleCustomSettingは、3 つの引数を取ります。
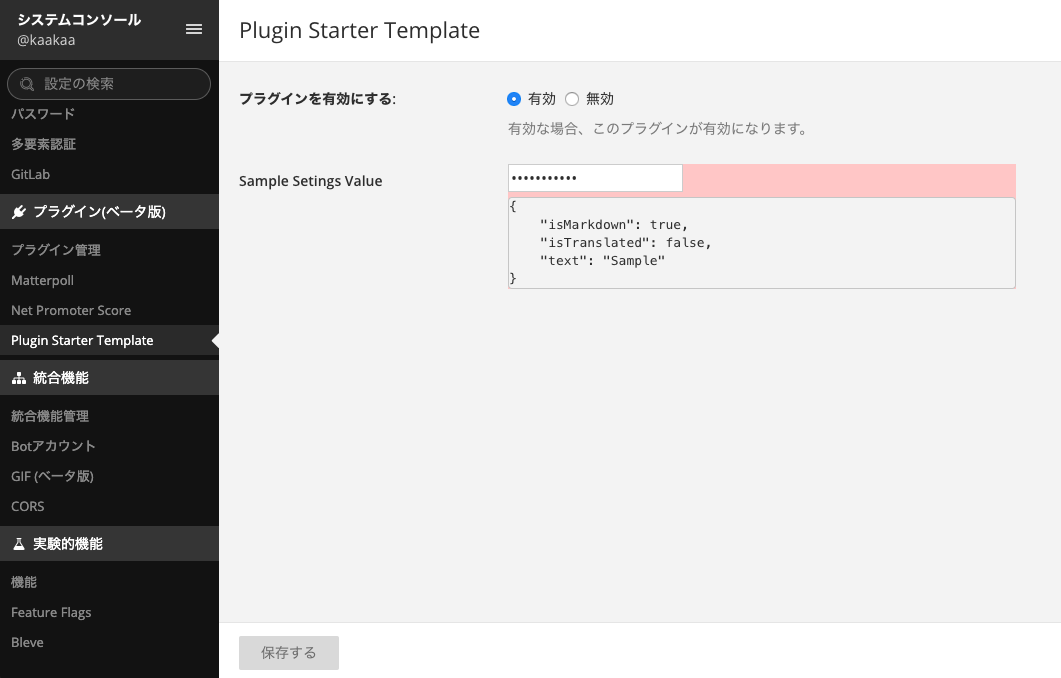
key: 上書きする設定項目のkey。keyは、マニフェストファイルに設定項目ごとに任意で指定する値です。component: 設定画面に表示される Component。options: 設定項目の表示方法についてのオプションshowTitle:trueを指定した場合、マニフェストファイルのdisplay_nameが設定項目の左側に表示されます
パスワードなどを入力する際に、入力項目を UI 上に表示しないような設定項目を追加する例を以下に示します。
{
    ...
    "settings_schema": {
        "settings": [
            {
                "key": "SampleSetting",
                "display_name": "Sample Setings Value",
                "type": "text",
                "help_text": "Sample",
                "default": "sample"
            }
        ]
    }
}
...
import CustomSettings from './components/custom_settings';
...
export default class Plugin {
    // eslint-disable-next-line no-unused-vars
    initialize(registry, store) {
		...
        // 独自の設定画面項目を追加する
        registry.registerAdminConsoleCustomSetting(
            'SampleSetting',
            CustomSettings,
            {showTitle: true}
        );
    }
}
import React from 'react';
import PropTypes from 'prop-types';

const CustomSettingsComponent = ({helpText, id, onChange, value}) => {
    const handleChange = (e) => {
        onChange(id, e.target.value);
    }
    return (
        <div style={{backgroundColor: '#ffcccc'}}>
            <input
              type={'password'}
              value={value}
              onChange={handleChange}
            />
            <pre>
                {JSON.stringify(helpText.props, null, 4)}
            </pre>
        </div>
    )
}

CustomSettingsComponent.propTypes = {
    helpText: PropTypes.shape ({
        props: PropTypes.object,
    }),
    id: PropTypes.string,
    onChange: PropTypes.func,
    value: PropTypes.any,
};

export default CustomSettingsComponent;
registerRightHandSidebarComponent
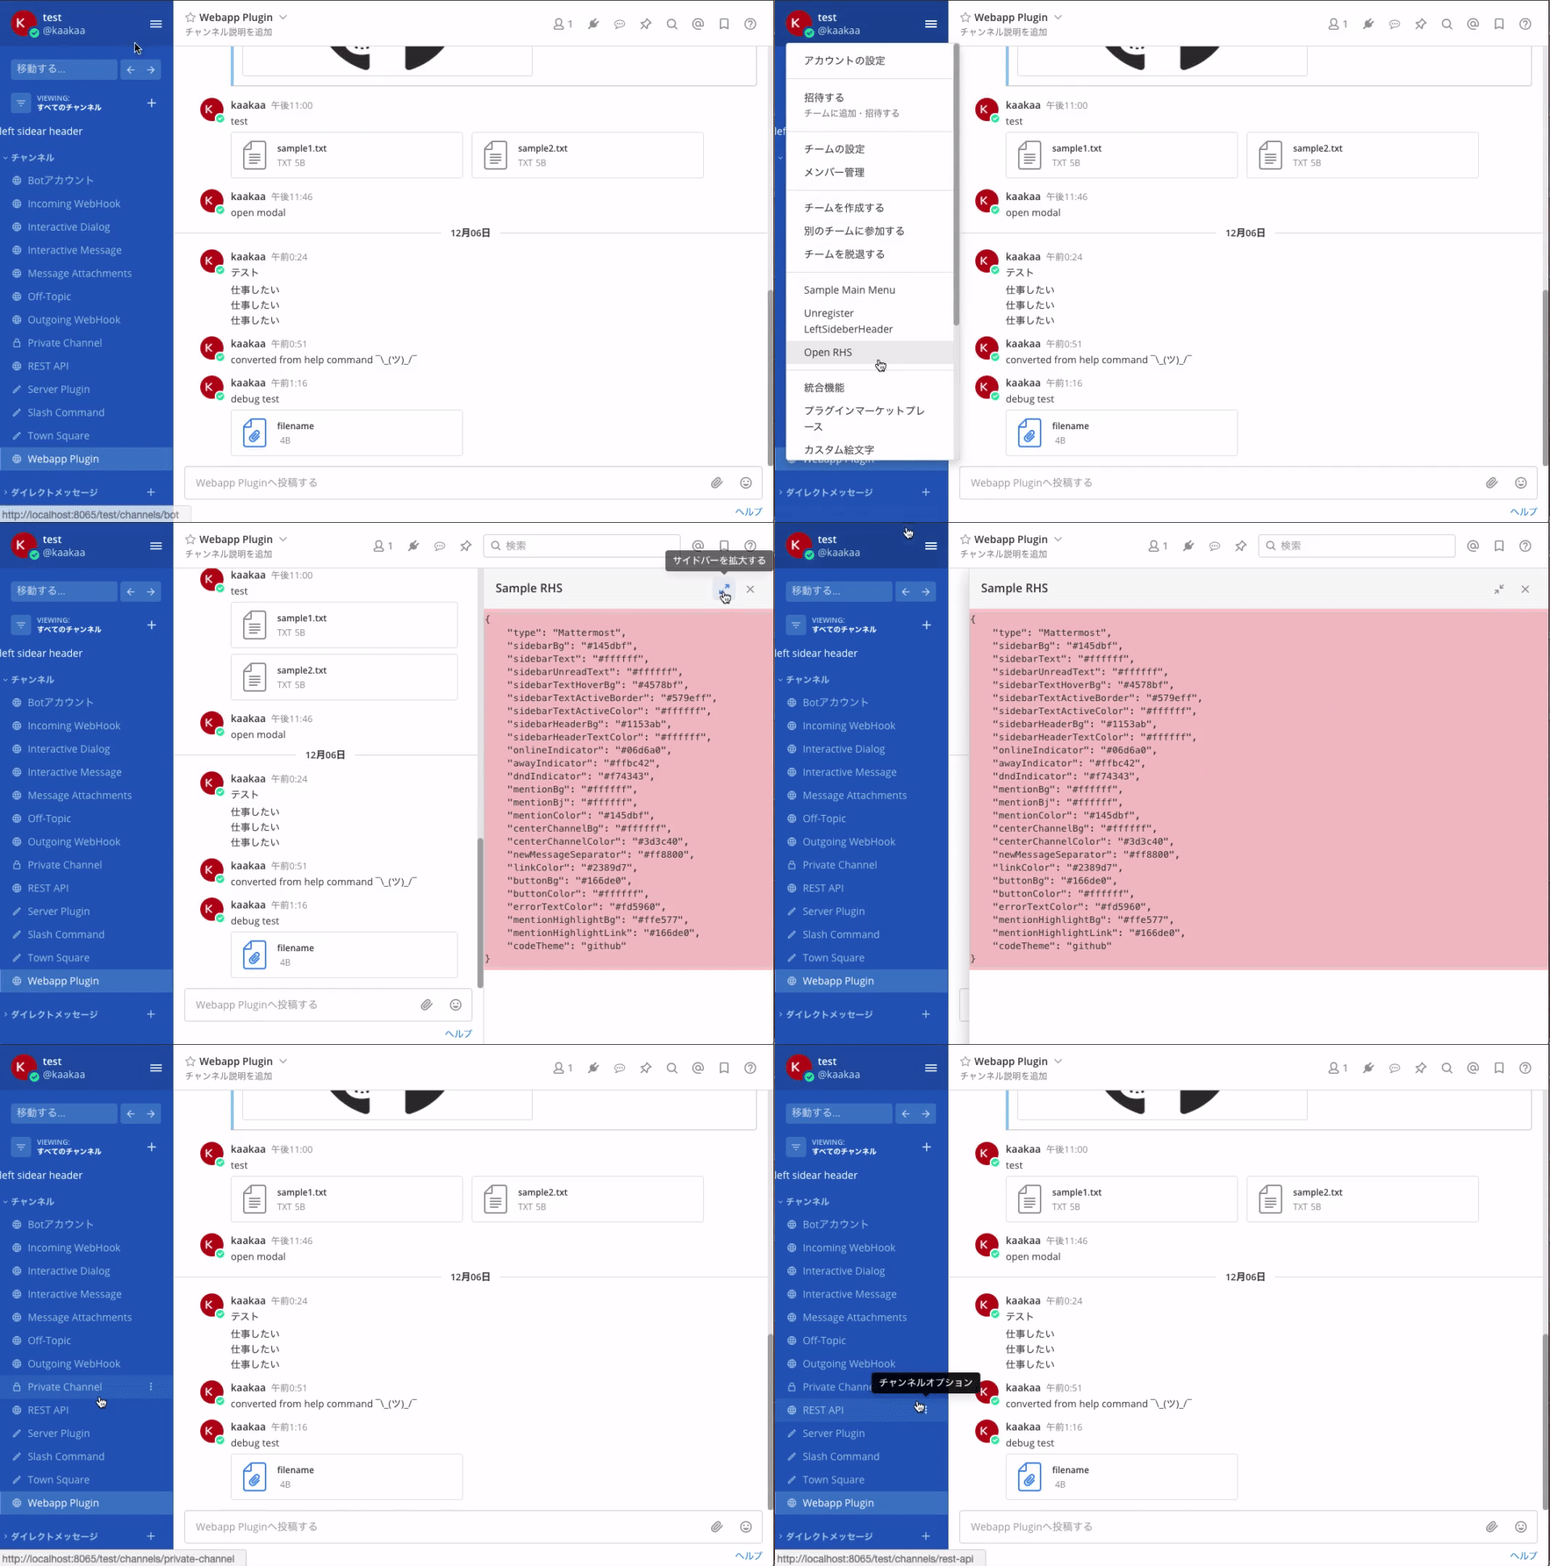
registerRightHandSidebarComponentは、Mattermost の右サイドバーに表示する独自の Component を登録します。
registerRightHandSidebarComponentは、2 つの引数を取ります。
component: 右サイドバーに表示される Componenttitle: 右サイドバーのタイトル部分に表示されるテキスト
また、registerRightHandSidebarComponentは 4 つの引数を返却します。
id: 登録された Component の IDshowRHSPlugin: 登録した Component を表示するためのアクションhideRHSPlugin: 登録した Component を非表示にするためのアクションtoggleRHSPlugin: 登録した Component の表示/非表示を切り替えるアクション
登録した Component は、他のプラグイン API からshorRHSPlugin、hideRHSPlugin、toggleRHSPluginのアクションを実行することで表示されるようになります。RHSはRightHandSideberの略です。
右サイドバーに独自の Component を表示するためのメニューをメインメニューに追加する例を以下に示します。
...
import CustomRightHandSideber from './components/custom_rhs';
...
export default class Plugin {
    // eslint-disable-next-line no-unused-vars
    initialize(registry, store) {
		...
        // 右サイドバーに表示される独自Componentを登録する
        const {toggleRHSPlugin} = registry.registerRightHandSidebarComponent(CustomRightHandSideber, "Sample RHS")
        // 右サイドバーを表示するためのメインメニューを追加する
        registry.registerMainMenuAction(
            'Open RHS',
            () => store.dispatch(toggleRHSPlugin),
            () => (<i/>)
        );
    }
}
import React from 'react';
import PropTypes from 'prop-types';

const ComponentRightHandSidebar = ({theme}) => {
    return (
        <div style={{backgroundColor: '#ffcccc'}}>
            <pre>
                {JSON.stringify(theme, null, 4)}
            </pre>
        </div>
    )
}

ComponentRightHandSidebar.propTypes = {
    PluggableId: PropTypes.string.isRequired,
    theme: PropTypes.object.isRequired,
};

export default ComponentRightHandSidebar;
registerNeedsTeamRoute
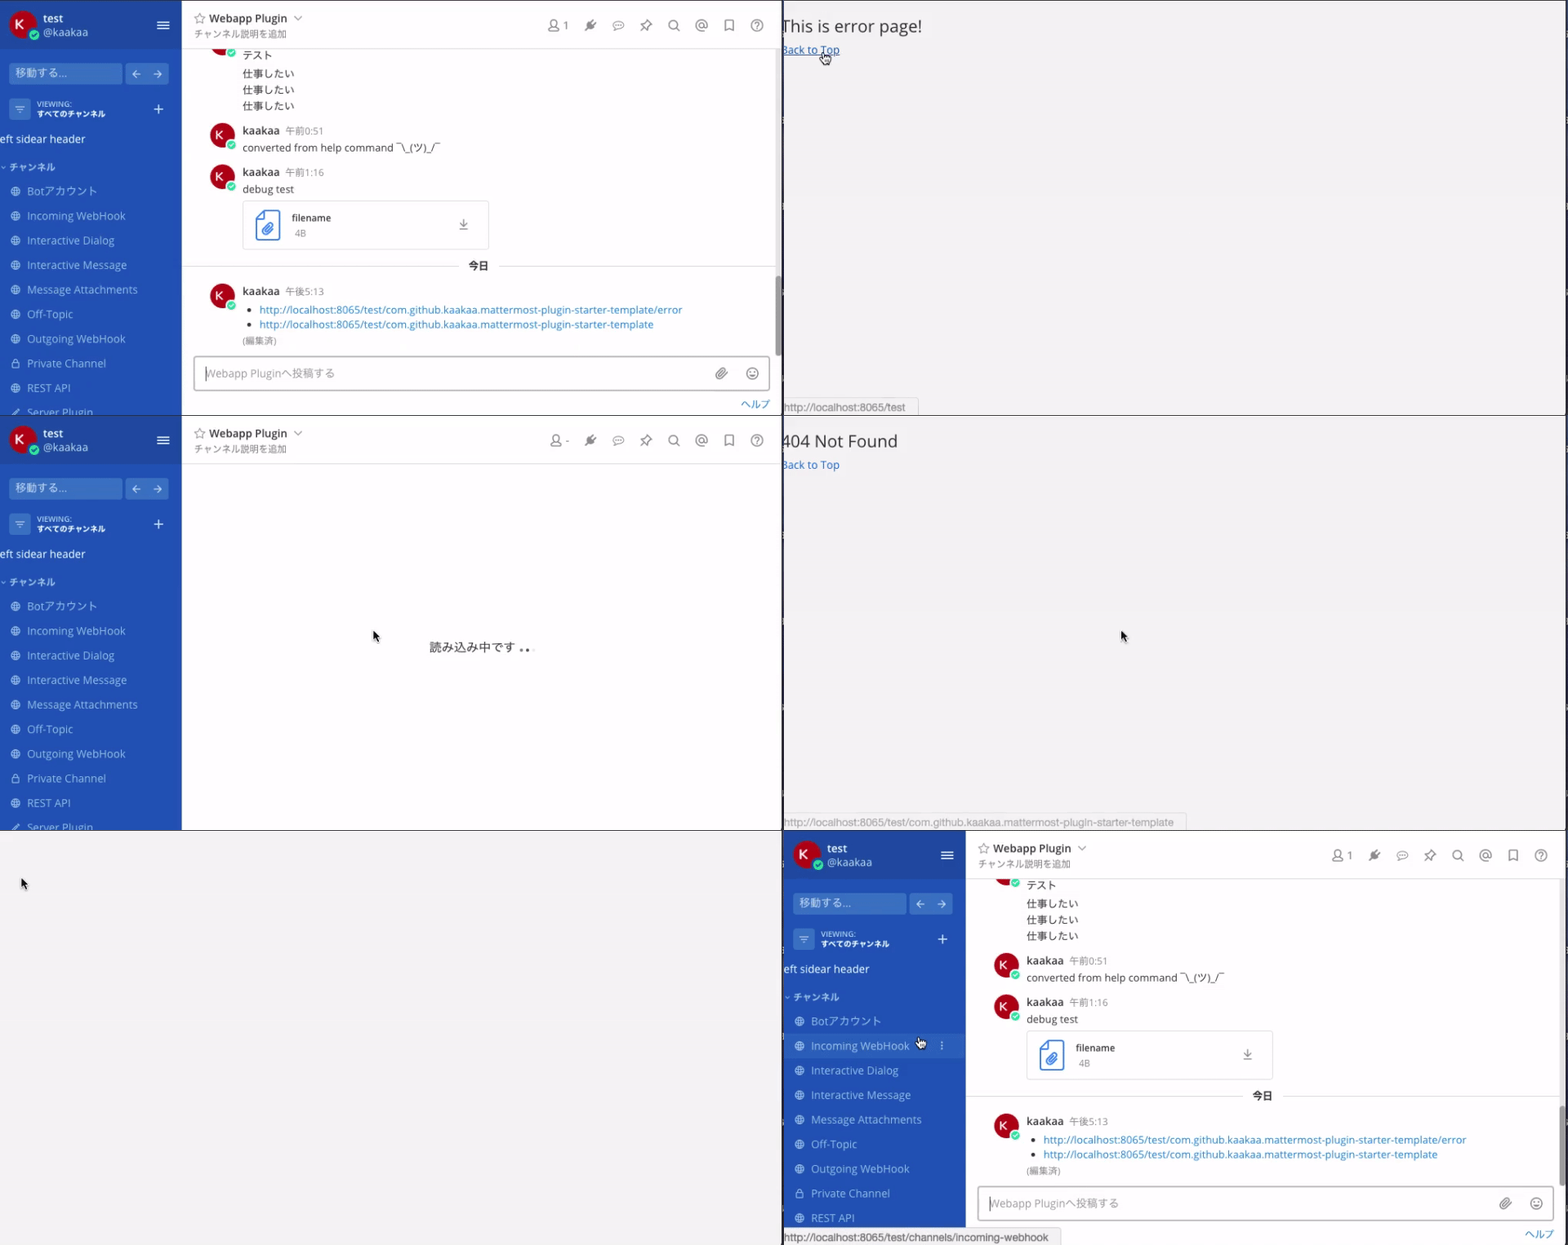
registerNeedsTeamRouteは、チームごとにプラグイン専用の Route を追加します。プラグイン専用のエラー画面を作成したい場合などに使用するものだと思います。
registerNeedsTeamRouteは、2 つの引数を取ります。
route: ルート文字列comopnent:routeにアクセスされた際に呼び出される Component
http://localhost:8065で Mattermost が起動していて、testというチーム名のチームがあり、sample.pluginというプラグイン ID を持つプラグインがインストールされており、その中でregisterNeedsTeamRouteの引数としてroute="/subpath"が指定されていた場合、http://localhost:8065/test/sample.plugin/subpathにアクセスすると、componentに指定したコンポーネントが呼び出されます。
以下に例を示します。
...
import CustomTeamRoute from './components/custom_team_route';
...
export default class Plugin {
    // eslint-disable-next-line no-unused-vars
    initialize(registry, store) {
		...
        // 独自のRouteを追加する
        registry.registerNeedsTeamRoute('/', CustomTeamRoute)
    }
}
import React from 'react';
import PropTypes from 'prop-types';

import {Switch, Route} from 'react-router-dom';
import {getCurrentTeam} from 'mattermost-redux/selectors/entities/teams';
import {useSelector} from 'react-redux';

import {id} from 'src/manifest';

const CustomTeamRouteComponent = () => {
    const currentTeam = useSelector(getCurrentTeam);
    return (
        <Switch>
            <Route path={`/${currentTeam.name}/${id}/error`}>
                <h3>{'This is error page!'}</h3>
                <p>
                    <a href={`/${currentTeam.name}`}>Back to Top</a>
                </p>
            </Route>
            <Route>
                <h3>{'404 Not Found'}</h3>
                <p>
                    <a href={`/${currentTeam.name}`}>Back to Top</a>
                </p>
            </Route>
        </Switch>
    )
}

CustomTeamRouteComponent.propTypes = {
    pluggableId: PropTypes.object.isRequired,
    theme: PropTypes.object.isRequired,
};

export default CustomTeamRouteComponent;
registerCustomRoute
registerCustomRouteは、プラグイン専用の Route を追加します。
registerNeedsTeamRouteは、/${team_name}/${plugin_id}/${route}のようにチームごとに Route を追加する API でしたが、registerCustomRouteは/plug/${plugin_id}/${route}のように、Mattermost 全体としてプラグインごとに一つの Route を追加する API です。
使い方はregisterNeedsTeamRouteとほぼ同じのため、例は省略します。
その他
Mattermost Plugin Webapp 開発中に使える Plugin 開発用の便利機能がいくつかあります。その概要だけ紹介します。
Theme
Mattermost Plugin API の中でも何度か出てきましたが、Webapp Plugin では Mattermost のテーマカラーを参照することができます。Mattermost ではユーザーごとにテーマカラーを変更することができるため、Webapp Plugin で UI の色を指定する場合は、ユーザーごとに見え方が異なることを考慮に入れる必要があります。
Mattermost で扱われるテーマカラー一覧は以下で紹介されています。
https://developers.mattermost.com/extend/plugins/webapp/reference/#theme
Exported Libraries and Functions
Mattermost Webapp Plugin は React.js を使用して開発しますが、React 開発によく使われるいくつかのライブラリは Mattermost 本体からwindowオブジェクトを介して取得できるようになっています。
取得できるライブラリは以下で紹介されています。
https://developers.mattermost.com/extend/plugins/webapp/reference/#exported-libraries-and-functions
また、windowオブジェクトから参照できるライブラリとしてwindow.PostUtilsというのがありますが、これは Mattermost フォーマットのテキストを扱うための便利関数を持つオブジェクトです。
以下のようにすることで、@メンションなどを含む Markdown テキスト(text)をフォーマットして扱うことができます。
const { formatText, messageHtmlToComponent } = window.PostUtils;

const text = "...";
const formattedText = messageHtmlToComponent(formatText(text));
https://developers.mattermost.com/extend/plugins/webapp/reference/#post-utils
Redux Action)
Webapp 上で投稿やユーザー情報の取得などの Mattermost に対する何かしらの処理を実行する場合、mattermost-reduxという Redux ライブラリがあります。これは Mattermost 本体の Webapp でも利用されている公式の Javascript API のような位置付けのものです。
mattermost-redux はもちろん Mattermost Plugin 開発でも使用することができ、下記のページで使い方について紹介されています。
https://developers.mattermost.com/extend/plugins/webapp/actions/
さいごに
本日は、Mattermost Plugin のWebappサイドの実装について紹介しました。 明日からは、Mattermost 上で投票機能を使うことができる MatterPoll プラグインの実装について紹介していきます。