Mattermost 記事まとめ: https://blog.kaakaa.dev/tags/mattermost/
本記事について
Mattermost の統合機能アドベントカレンダーの第 16 日目の記事です。
本記事では、Mattermost でユーザーの入力を受け付けるダイアログを表示する Interactive Dialog の機能について紹介します。
Interactive Dialog の概要
Interactive Dialog は、Slash Command や Interactive Message などのアクションを起点に、Mattermost 上にユーザー入力を受け付けるダイアログ(モーダルウィンドウ)を表示する機能です。
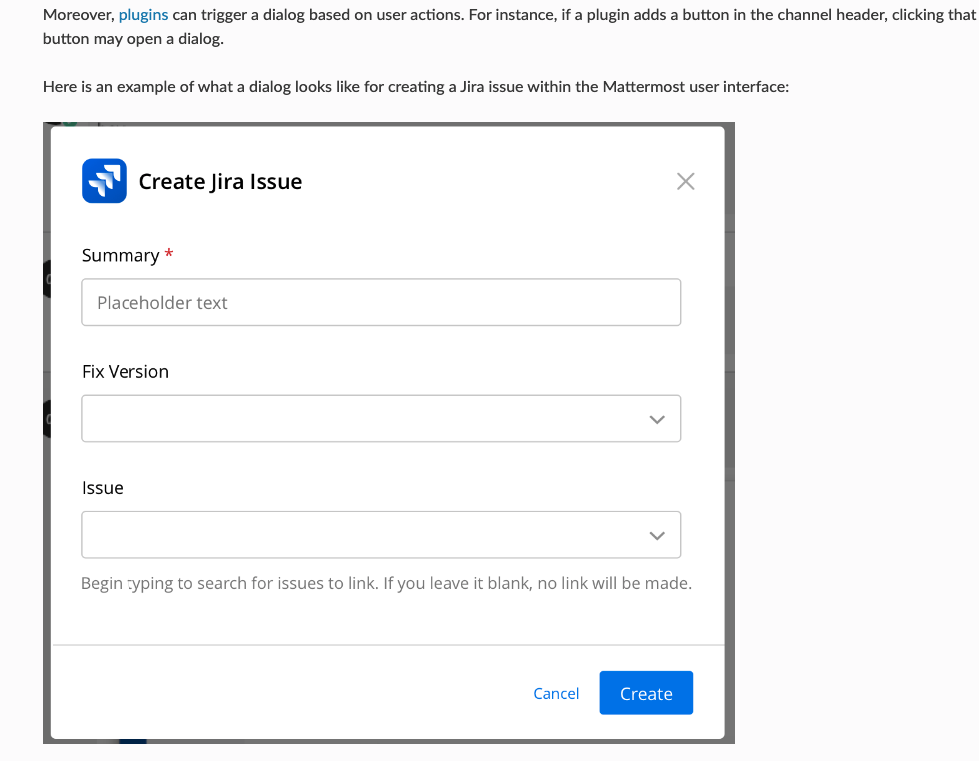 (画像は公式ドキュメントから)
Interactive Dialog に関する公式ドキュメントは下記になります。
Interactie Dialog は、何度か Mattermost とインタラクションをしながら動作するもののため、動作が複雑になります。今までのようにcurlだけで動作させることは難しいため、Go のコードで書いたものを断片的に紹介していきます。
今回は、Interactive Dialog の入力内容から Message Attachments のメッセージを作成するような例を考えてみます。
Trigger ID の取得
Interactive Dialog を起動するには、まず、Mattermost 内部で生成される Trigger ID というものが必要です。Trigger ID は Slash Command や Interactive Message のアクションを実行した時に、Mattermost から送信されるリクエストに含まれています。Slash Command 実行時のリクエストから Trigger ID を取得する場合、Slash Command 実行時に送信されるリクエストを処理するサーバーで、以下のように Trigger ID を取得することができます。
	http.HandleFunc("/command", func(w http.ResponseWriter, r *http.Request) {
		r.ParseForm()

		// (1) Slash Command実行時に送信されるリクエストから "Trigger ID" を取得
		triggerId := r.Form.Get("trigger_id")

		...
Interactive Message Button などのアクションから取得する際は、PostActionIntegrationRequest.TriggerIdから Trigger ID を取得できます。
Interactive Dialog の起動
先ほど取得した Trigger ID を使って、Mattermost へ Interactive Dialog 起動のリクエストを投げます。
Trigger ID を取得するコードに続けて、/api/v4/actions/dialogs/openにOpenDialogRequestで定義されるリクエストを送信することで Interactive Dialog を起動することができます。
	http.HandleFunc("/command", func(w http.ResponseWriter, r *http.Request) {
		r.ParseForm()

		// (1) Slash Command実行時に送信されるリクエストから "Trigger ID" を取得
		triggerId := r.Form.Get("trigger_id")

		// (2) Interactive Dialogを起動するためのリクエストを構築
		request := model.OpenDialogRequest{
			TriggerId: triggerId,
			URL:       "http://localhost:8080/actions/dialog",
			Dialog: model.Dialog{
				Title: "Sample Interactive Dialog",
				Elements: []model.DialogElement{{
					DisplayName: "Title",
					Name:        "title",
					Type:        "text",
				}, {
					DisplayName: "Message",
					Name:        "message",
					Type:        "textarea",
				}},
			},
		}

		// (3) Interactive Dialogを開く
		b, _ := json.Marshal(request)
		req, _ := http.NewRequest(http.MethodPost, "http://localhost:8065/api/v4/actions/dialogs/open", bytes.NewReader(b))
		req.Header.Add("Content-Type", "application/json")
		resp, err := http.DefaultClient.Do(req)

		...
(2)で構築しているOpenDialogRequestにどのようなダイアログを表示するかという情報も指定するのですが、詳しくは後述します。
(3)で/actions/dialogs/openにリクエストを送信していますが、ここでは AccessToken などが必要ありません。これは Trigger ID 自体の利用可能期限が 3 秒と短く、悪用の心配がないためだと思われます。この点は、Trigger ID を取得してからダイアログを開く前に時間のかかる処理などを入れないよう注意する必要があるということも意味します。
/actions/dialogs/openへのリクエストが正常に完了すると、Mattermost 上で Interactive Dialog が表示されます。
Interactive Dialog 起動時のパラメータ
Interactive Dialog を起動する際に送信するOpenDialogRequestに与えることができるパラメータは下記の通りです。
TriggerId: Slash Command や Interactive Message のアクションを実行した時に Mattermost 内部で生成される Interactive Dialog 起動用の ID を指定しますURL: Interactive Dialog に入力された情報の送信先 URL を指定しますDialog: Interactive Dialog 上に表示される要素を指定しますCallbackId: 統合機能で設定される ID です。Slash Command の場合はCommandArgs.RootId、Interactive Message の場合はPostActionIntegrationRequest.PostIdを指定している気がしますが、何に使われているかはいまいちわかりません。Title: Interactive Dialog のタイトル部分に表示されるテキストを指定しますIntroductionText:Titleの下に表示されるダイアログの説明文を指定しますIconURL: ダイアログに表示されるアイコンの URL を指定しますSubmitLabel: ダイアログの決定ボタンのラベルを指定しますNotifyOnCancel: ダイアログのキャンセルボタンが押された時に、サーバーにその旨を通知するかを選択します。trueの場合、キャンセル通知がサーバーに送信されますState: 統語機能によって処理の状態を管理したい場合に設定される任意のフィールドですElements: ダイアログ上の入力フィールドを指定します。利用可能なElementについては公式ドキュメントを参照してください。
Interactive Dialog からのリクエスト受信
Interactive Dialog の送信ボタンが押されると、OpenDialogRequestのURLフィールドに指定した URL へリクエストが送信されます。
		// (2) Interactive Dialogを起動するためのリクエストを構築
		request := model.OpenDialogRequest{
			TriggerId: triggerId,
			URL:       "http://localhost:8080/actions/dialog",
			...
送信されるリクエストは Mattermost のコードではSubmitDialogRequestとして定義されています。
type SubmitDialogRequest struct {
	Type       string                 `json:"type"`
	URL        string                 `json:"url,omitempty"`
	CallbackId string                 `json:"callback_id"`
	State      string                 `json:"state"`
	UserId     string                 `json:"user_id"`
	ChannelId  string                 `json:"channel_id"`
	TeamId     string                 `json:"team_id"`
	Submission map[string]interface{} `json:"submission"`
	Cancelled  bool                   `json:"cancelled"`
}
ユーザーが Interactive Dialog 上で入力したデータは Submission に格納されています。SubmissionはOpenDialogRequest内のDialogElementのNameを key、入力データを value とした map 形式のデータです。
今回の Interactive Dialog では、titleとmessageというNameを持つDialogElementを指定しているため、Submissionからはこれらの値をキーとする Value が格納されています。
...
Elements: []model.DialogElement{{
	DisplayName: "Title",
	Name:        "title",
	Type:        "text",
}, {
	DisplayName: "Message",
	Name:        "message",
	Type:        "textarea",
}},
...
以上より、Interactive Dialog からのリクエストを受信し、入力内容から Message Attachment のメッセージを作るアプリケーションは以下のようになります。
...
	http.HandleFunc("/actions/dialog", func(w http.ResponseWriter, r *http.Request) {
		defer r.Body.Close()

		// (4) リクエストデータの読み出し
		b, _ := ioutil.ReadAll(r.Body)
		var payload model.SubmitDialogRequest
		json.Unmarshal(b, &payload)

		title, ok := payload.Submission["title"].(string)
		if !ok {
			resp := model.SubmitDialogResponse{Error: "failed to get title"}
			w.Header().Add("Content-Type", "application/json")
			io.WriteString(w, string(resp.ToJson()))
			return
		}
		msg, ok := payload.Submission["message"].(string)
		if !ok {
			resp := model.SubmitDialogResponse{Error: "failed to get message"}
			w.Header().Add("Content-Type", "application/json")
			io.WriteString(w, string(resp.ToJson()))
			return
		}

		// (5) Message Attachmentsインスタンス作成
		post := &model.Post{
			ChannelId: payload.ChannelId,
			Props: model.StringInterface{
				"attachments": []*model.SlackAttachment{{
					Title: title,
					Text:  msg,
				}},
			},
		}

		// (6) REST APIによるメッセージ投稿
		req, _ := http.NewRequest(http.MethodPost, "http://localhost:8065/api/v4/posts", strings.NewReader(post.ToJson()))
		req.Header.Add("Authorization", "Bearer "+MattermostAccessToken)
		req.Header.Add("Content-Type", "application/json")
		resp, err := http.DefaultClient.Do(req)

		// (7) エラー処理
		dialogResp := model.SubmitDialogResponse{}
		if err != nil {
			dialogResp.Error = err.Error()
		}
		if resp.StatusCode != http.StatusCreated {
			dialogResp.Error = fmt.Sprintf("failed to request: %s", resp.Status)
		}
		w.Header().Add("Content-Type", "application/json")
		io.WriteString(w, string(dialogResp.ToJson()))
	})
...
Interactive Dialog からのリクエストを受け取ったら、(4)でリクエストを SubmitDialogRequest形式で読み込みます。そして、SubmitDialogRequestのSubmissionからtitle、messageをキーに持つ値を取得します。Submissionの Value はinterface{}型なので、文字列の場合はキャストが必要です。
データを読み出せたら (5) で、読み出したデータを使って Message Attachments を含むPostインスタンスを作成し、(6)で REST API 経由で投稿を作成しています。REST API を実行するため、Mattermost のアクセストークン(MattermostAccessToken)を事前に取得しておく必要があります。
最後に (7) で REST API の実行結果をチェックし、エラーが発生している場合はSubmitDialogResponse形式のデータを返却します。
type SubmitDialogResponse struct {
	Error  string            `json:"error,omitempty"`
	Errors map[string]string `json:"errors,omitempty"`
}
SubmitDialogResponseのErrorには Interactive Dialog 全体のエラーとして表示される文字列、ErrorsにはDialogElementの要素ごとのエラーメッセージを指定します。ErrorsはSubmissionと同じくDialogElementのNameを key とする map 形式でエラーメッセージを指定します。
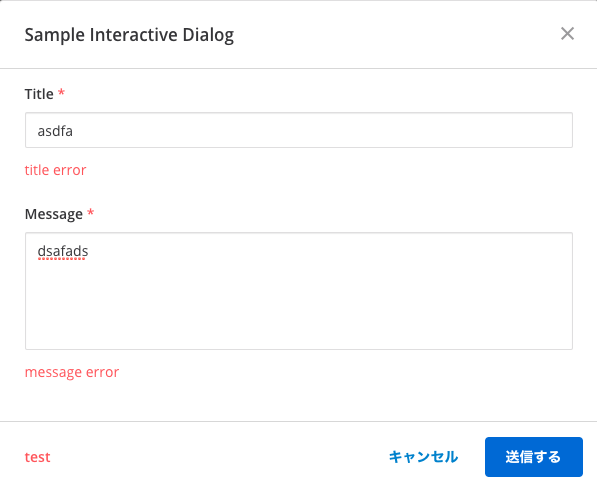
試しに、以下のようなSubmitDialogResponseを返したときの結果を紹介します。
dialogResp.Errors = map[string]string{
	"title":   "title error",
	"message": "message error",
}
dialogResp.Error = "error"
w.Header().Add("Content-Type", "application/json")
io.WriteString(w, string(dialogResp.ToJson()))
以上のように Interactive Dialog からのリクエストを処理できます。
さいごに
本日は、Interactive Dialog の使い方について紹介しました。 明日からは、Mattermost のプラグイン機能について紹介していきます。